Today I will create a workflow which sends an email to two different mailboxes based on two sets of results.
This is based on the requirements below from reader Suzie:
“Hi,
I have been asked to create a workflow that runs based on 2 sets of results within a list.
1.If a user answers YES to any 4 out of 6 questions in the list, an email is sent to mailbox A
2.If a user answers YES to 2 or less of the 6 questions, an email is sent to mailbox B
The question columns are all Yes/No check boxes. Is this possible and if so, how would I do this.
Thanks,
Suzie”
Step #1 – Create a Custom SharePoint list
- I am going to assume the user knows how to create a custom SharePoint list
- I am creating this example using SP 2013 and SPD 2010 Workflow
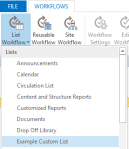
- Create a list – for this example I used “Example Custom List”
- Create 6 Questions, each as a Yes/No column type
- Leave the title question
Step #2 – Create a SharePoint Designer Workflow
- I am using SPD 2013 but have selected to create a SPD 2010 workflow
- Navigate to the site in SPD
- Select Workflows
- Create a new List Workflow – and select the “Example Custom List”
- Give it a name – for this example I used “Email A and Email B”
- Click the name of the workflow and in Start Options check the box to Start workflow when an item is created
- Click Edit workflow
Step #3 – Create the logic for the Workflow
- Rename the first Step to “Calculate Columns”
- Select Local Variables at top ribbon
- Then create 6 different Local Variables
- Name them “Calculate 1”, “Calculate 2”, “Calculate 3”, “Calculate 4”, “Calculate 5”, “Calculate 6”
- Make sure each one is a Number type of variable
- Create the logic:Select this entire group and copy
- Select Condition at top ribbon
- Select Any value equals current value
- Select value Question 1 equals value Variable Calculate 1
- Set Action at top ribbon
- Select Set workflow variable
- Select variable Calculate 1 to 1
- Select Else-If branch
- Select Set workflow variable
- Select variable Calculate 1 to 0 (zero)
- Then paste down the page 5 times
- Change each value to the next Question # and Calculate # (Question 2, Calculate 2….)
- Insert a new Step and rename it “Calculate Total”
- Select Action at top ribbon
- Select Do Calculation
- Select the first “value” in the statement and click the fx next to the blank space
- Change the Data Source in the dialog window to Workflow variables and parameters
- Change the Field from source to “Calculate 1”
- Select the second “value” in the statement and click the fx next to the blank space
- Change the Data Source in the dialog window to Workflow variables and parameters
- Change the Field from source to “Calculate 2“
- Rename the variable outcome to “Q1+Q2”
- Repeat #11-19 two more times but add variables “Calculate 3” + “Calculate 4”; and “Calculate 5 + Calculate 6”
- Select Do Calculation again – but now add the variable outcomes for the above like this:
- “Q1 +Q2″ plus Q3 + Q4” (Output to variable renamed to “Q1+Q2+Q3+Q4”)
- Select Do Calculation again – but now add this
- “Q1+Q2+Q3+Q4″ plus”Q5+Q6” (Output to variable renamed to “Total Yes”)
So the above seems a bit convoluted, but in essence what I have done is create local variables that say for example, IF Question 1 = Yes, the saved variable “Calculate 1” = 1; IF Question 1 = No, the saved variable “Calculate 1” = 0 (zero). This was repeated for all six questions using Else if branches. Then I created a second step to add all the variables. Unfortunately, I didn’t see a way to calculate more than two values at a time, so I had to add the variables for Q1 and Q2 (which are “Calculate 1” + “Calculate 2”), etc. Then I had to add those sums up for a total. Now when the user answers the questions, the workflow will run and put a 1 value for each Yes answer. The variables will be added up for a total. The totla number of Yes answers will be used to determine which mailbox should be emailed.
Your logic should look just like this screen shot:
Step #4 – Create the Emails
- Add a new Step to the Workflow and rename it “Send Email A or Email B”
- Create the logic for Email A:
- Select Condition at top ribbon
- Select If any value equals value
- Select the first value link
- Select the fx next to the blank space
- Change the Data Source in the dialog window to Workflow variables and parameters
- Change the Field from source to the variable “Total Yes”
- Change the operator to “is greater than or equal to”
- Change the second value to 4
- Select Action at top ribbon
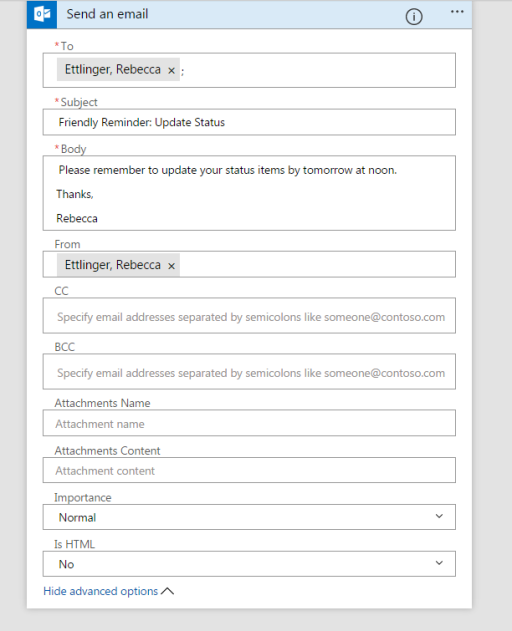
- Select Send an Email
- Click these users link
- Select who to send the email to, create a subject line and a body
- Create the logic for Email B:
- Select Else if branch at top ribbon
- Select If any value equals value
- Select the first value link
- Select the fx next to the blank space
- Change the Data Source in the dialog window to Workflow variables and parameters
- Change the Field from source to the variable “Total Yes”
- Change the operator to “is less than or equal to”
- Change the second value to 2
- Select Action at top ribbon
- Select Send an Email
- Repeat Steps to format the email to line, subject line and body
- End the workflow:
- Select Else if branch at top ribbon
- Select Action at top ribbon
- Select Stop workflow
- In the log message link add a message that explains why the workflow didn’t send an email (IE: user selected 3 Yes questions)
Step #5 – Test the workflow
- Go the custom list named Example Custom List
- Add a new item, answer 5 questions as Yes
- Add a new item, answer 2 questions as Yes
- Add a new item, answer 3 questions as Yes
Results should be:
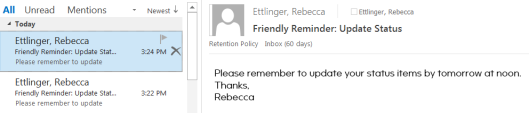
- Email is sent to Email A for the 5 Yes answers
- Email is sent to Email B for the 5 Yes answers
- Email is not sent to any mailbox for the 3 Yes answers
See all screen shots here:


You must be logged in to post a comment.